09/08/2014

How To Save Time Bookkeeping

Five Quick Tips To Save Time Bookkeeping

Bookkeeping can be time consuming for business owners. Here are five easy ways to save time bookkeeping.

1. Never record sales in a word processor. Though word processors may provide more options for invoice templates it creates a double up of work. If you are using accounting software it is definitely worth the time to setup an invoice template to record your sales. It saves you time because each time you create an invoice in the accounting software you record your sale as well. You may not be able to get the exact colour or layout of the invoice that you prefer but the time saved is definitely worth the trade off.

2. Integrate your point-of-sale system with your accounting software. This is a huge time saver for retail businesses. Each time your process a sale through your point-of-sale system it does the necessary entries into your accounting software. No need to enter in daily sales totals or movements of inventory. Accounting software like Xero is perfect for this as it has loads of add-ons including point-of-sale software.

3. Don’t use old school docket https://onhealthy.net/product-category/antifungals/ books. Handwritten invoices are out of date. Not only do they create double the work for processing sales, they just aren’t cool. If you need write out invoices on the go and you own a smart phone, why not use an invoicing app. These integrate with your accounting software. You simply draft your invoice and email it to your client. The invoice is automatically recorded in your accounting software as sale.

Save time bookkeeping

4. Make payments in batches. Set aside time each week for weekly bills or once a month for monthly accounts. Avoid paying bills one by one, as it is very time consuming. Instead create a batch payment file for your accounts payable. Simply upload it to your online banking and your bank will pay all your bills at once.

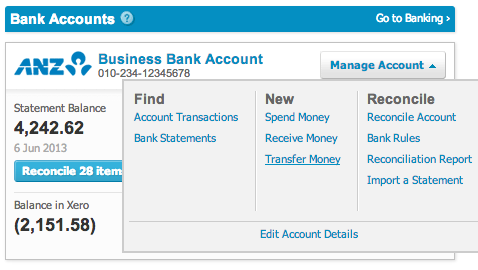
5. Use bank feeds. Some accounting software let you use bank feeds. These automatically upload your bank statements into your accounting software. This feature significantly speeds up bank reconciliations. No need to enter the bank statement data into your accounting software anymore.

If you would like more information on any of the topics covered, please feel free to contact us anytime.

Posted in: Bookkeeping, Xero
Tags:
05/08/2014

Paperless Bookkeeping For Small Businesses

Clear your desk and simplify your life with paperless bookkeeping. Imagine not having the stress of paperwork in your small business. Wouldn’t it just make your life easier? It may sound far-fetched but paperless bookkeeping can actually be a way of life.

Paperless bookkeeping

Paperless Bookkeeping With Bank Feeds.

The introduction to cloud-based accounting software was the starting point to this life. Cloud-based accounting software uses automatic bank feeds. Bank feeds automatically import all of your bank account transactions. No need to print off statements or have them mailed to you. No need to manually enter bank data. Xero is one of more popular cloud-based accounting software products available. It has access to hundreds of banks, credit card facilities, PayPal and over 160 foreign currencies. Not only do bank-feed reduce the time you spend on your books. They eliminate your need of paper bank statements and start you on the journey to complete paperless bookkeeping.

Paperless Bookkeeping With Shoeboxed.

Shoeboxed is a Sydney-based company that scans and organises your receipts, invoices and other documents securely online. Simply send (post or email) all your paperwork into Shoeboxed. Shoeboxed will then https://xanaxcost.com/anxiety-medication-xanax/ extract the data (date, vendor, amount, GST, payment type) from the documents. They then upload and store them in your secure online account. You simply check that they have been allocated to the right account type with the correct GST codes and import them into your accounting software. They can either send all your documents back to you or you can request that they shred them. They will store all your electronic copies online where you will always access them. Shoeboxed will even help you if you ever get audited by providing the Australian Taxation Office with access to your documents.

Cloud-based accounting and Shoxboxed will give you a strong start on your journey to paperless bookkeeping. They will help you simplify your bookkeeping and reduce your stress levels. If you would like to find out even more ways your small business can do paperless bookkeeping, please contact us. At Prestige Bookkeeping Solutions, we pride ourselves on providing bookkeeping innovation and efficiency for all our clients. Check out our bookkeeping services for more detail on how we can solve your bookkeeping needs.

04/08/2014

How To Easily Manage Petty Cash In Xero

Dealing with petty cash in Xero is simple. There are plenty of different ways to deal with petty cash in your small business. Firstly, it must be clear when it comes to petty cash there are general rules and outcomes that never change:

  • Purchases have to be related to your small business.
  • If someone takes money from the tin and promises to bring back a receipt, they probably won’t.
  • When someone puts an IOU in the petty cash tin. It means they won’t pay you back.
  • No matter how strict you are, petty cash will never balance.

There are two main ways to manage petty cash in xero, depending on whether you have employees or are an owner operator.

Petty Cash in Xero with Employees

Setup your petty cash system using these five steps:

  1. Buy a petty cash box with a lock and key.
  2. Assign a gatekeeper for the petty cash tin.
  3. Set an amount to be used as a float.
  4. Have your gatekeeper keep your employees accountable to return receipts and change.
  5. When the petty cash tin is low on funds. Sort the receipts and go to the bank and top it up to original float amount.

Setting up petty cash in Xero:

  1. Setup a bank account that will represent the transactions in the petty cash tin. You do this by clicking the ‘add bank account’ button in the chart of accounts settings. Enter your petty cash tin balance into Xero in the conversion balance settings. Whenever you restock the petty cash tin.
  2. Click the ‘Manage Account’ button in Xero of the appropriate bank account (as shown in picture below). Click the  ‘Transfer Money ‘ button to account for the transfer of money into your petty cash tin.
  3. To record transaction that occur in your petty cash tin, use the ‘Manage Account’ drop down box again. Select ‘Spend Money’ or ‘Receive Money’ and enter in the appropriate details.
  4. When you want to reconcile the account, use the ‘Manage Account’ drop down box and select ‘Reconcile Account’. Since there is no bank feed attached to this account, simply tick all items entered and select ‘Mark as Reconciled’ which will update your actual bank balance figure.

Managing petty cash in Xero

Petty Cash in Xero for Owner Operator.

For owner operators, tracking petty cash in xero is even easier:

  1. Download the Xero app for your smart phone, iPhone or Android.
  2. Each time you make a purchase with personal cash or electronic funds ask for a tax receipt.
  3. Enter in the purchase in the Xero app as an expense claim. The app allows you to take a photo of the receipt and allocate the expense to the appropriate account in Xero.
  4. You can now discard the receipt as Xero will save its photo with the transaction online.
  5. When it’s time to reimburse yourself. Log into Xero and approve and pay all the expense reimbursements you have entered. If you want to leave the money in the business just allocate the reimbursement to “Owners Funds Introduced’. This will keep track of how much personal money you have used in the business and allow you to claim the GST credits for those purchases.

It’s that simple, no more annoying receipts and headaches.

Please feel free to contact us if you would you like more information on our bookkeeping services or Xero bookkeeping.

Posted in: Bookkeeping, Xero
Tags:
02/08/2014

End Of Year Payroll Guide For Xero

Completing your end of year payroll obligations has never been easier in Xero. You just need to follow these four simple steps

Step 1: Complete all pay runs up to 30 June and ensure they reconcile with the general ledger. Post or cancel any uncompleted pay runs (as shown in the picture below).End of Year Payroll with Xero

  • Once you have completed the final pay run for June, check that your total earnings, superannuation and PAYG reconcile to your accounts. To do this go to ‘Reports’ and select the ‘Payroll Activity Summary’ report. Change the date range to ‘This Financial Year’.
  • Take note of your end of year payroll accounts (earnings, tax & super). Compare these figures with the ‘General Ledger’ report for the same date range.
  • If you have been using more than one wage account you will need to add these up to see if they match the ‘Payroll Activity Summary’ report.
  • When comparing the tax we want to only look at the credit column as this represents the total liability for the year excluding the payments we have already made.
  • If you have discrepancies with any of your end of year payroll amounts, you will need review your payroll and correct these differences before you proceed to step 2.

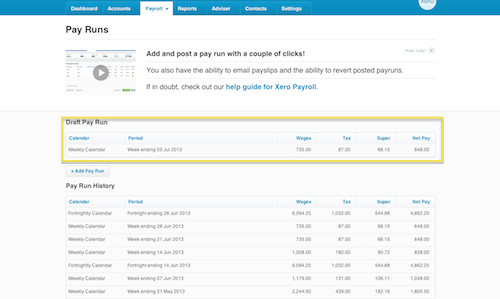
Step 2: Check that each employee’s specific pay components have been recorded correctly in payroll.

  • To do this go to ‘Reports’ and select the ‘Payroll Activities Details’ report. Change the date range to ‘This Financial Year’.
  • Review the information for each employee. If any of their end of year payroll amounts are incorrect or are in this wrong area, you will need to correct them. Go to the Xero Help Centre to learn how to correct these errors.

Step 3: Run the end of year payroll payment summaries.

  • To do this go to ‘Payroll’, ‘Employees’ and select ‘Payment Summaries’.
  • Check that your organisation name, ABN and postal address are correct. If they are wrong, go to ‘Organisation Settings’ to update them.
  • Enter the Signatory (Usually the business owner or payroll administrator). This name will be printed out on the payment summaries as the authoriser.
  • Provide a phone number that the ATO can contact you on if they need to get any more information from you.
  • When finished, select ‘Confirm and Continue’.
  • Check the financial year is correct and record any reportable fringe benefit or lump sum amounts.
  • Reportable fringe benefit amounts can be found on your reportable fringe benefits tax return.
  • If you paid employees lump sum amounts during the year, you should have created a pay item for these. You can find these in the ‘Transaction Listing Details’ report under ‘Reports’.
  • Once finished, select all the employees and ‘Publish’. Publishing locks the end of year payroll accounts down and publishes payments summaries to the employee portal so that your employees will have access to them.
  • If you prefer to print or email the payment summaries to your employees, select ‘Send to Employee’

Step 4: Send end of year payroll information to the ATO.

  •  On the same screen, select ‘Create EMPDUPE’
  • If you are preparing the end of year payroll information on behalf of another business, select ‘Yes’ to supply contact details to the ATO. If you don’t need to supply contact details, then select ‘No’.
  • Once the EMPDUPE file is created, you need send it to the ATO.
  • You can either, upload it to the ATO online portal, submit it via ATO ECL software or submit it on a storage device (e.g. USB stick or CD).

Your finished until next year! Should you have any questions about our bookkeeping services or end of year payroll in Xero please do not hesitate to contact us.